Showing posts with label tutorial. Show all posts

Monday, February 9, 2015

AndEngine Tutorial 1 - Drawing Rectangles

With this AndEngine tutorial you'll learn how to easily draw shapes.

AndEngine Tutorial 1 - Drawing Rectangles


Hello again to our first series of AndEngine tutorials. At this point you already should be able to create a Basic Game Activity (check our last tutorial here). You can use the Basic Game Activity template in any of our tutorials in this series.

Today we are going to learn how to draw rectangles easily in AndEngine.

This is very handfull when you need to create simple interface elements, so let's start.

Remember our background from our last tutorial? Let's change its color to become more pleasant.

myScene.setBackground(new Background(0.384f, 0.412f, 0.325f));

Before drawing anything, let's define the VertexBufferObjectManager that is used by AndEngine to draw basically anything. The best way to use it is to create a variable that we can call at any time in our game, so we don't need to call it everytime we draw something. To do that, put this line of code just before the EngineOptions of your Basic Game Activity:

private VertexBufferObjectManager vbom;

Then we add this line to the class onCreateResources:

vbom = getVertexBufferObjectManager();

Drawing rectangles


Now let's draw rectangles! The Rectangle function is pretty simple to use. You just need to define starting point and dimensions (width and height). Try to include these four lines in the onPopulateScene class and see what happens:

  Rectangle rectangle1 = new Rectangle(384, 1080, 718, 50, vbom);
  rectangle1.setColor(0.894f, 0.980f, 0.694f);
  myScene.attachChild(rectangle1);
  
  Rectangle rectangle2 = new Rectangle(384, 1045, 718, 20, vbom);
  rectangle2.setColor(0.776f, 0.894f, 0.506f);
  myScene.attachChild(rectangle2);
  
  Rectangle rectangle3 = new Rectangle(384, 200, 718, 50, vbom);
  rectangle3.setColor(0.894f, 0.980f, 0.694f);
  myScene.attachChild(rectangle3);
  
  Rectangle rectangle4 = new Rectangle(384, 165, 718, 20, vbom);
  rectangle4.setColor(0.776f, 0.894f, 0.506f);
  myScene.attachChild(rectangle4);

Looks nice, doesn't it? :)

Of course you can create things in batch! Try this, for example:

  for(int i = 0; i < 3; i++) {
   for(int j = 0; j < 3; j++) {
    
    Rectangle shadow = new Rectangle(192 * (j + 1), 100 + 265 * (i + 1), 100, 100, vbom);
    shadow.setColor(0.329f, 0.380f, 0.435f);
    shadow.setRotation(45);
    myScene.attachChild(shadow);
    
    Rectangle front = new Rectangle(192 * (j + 1), 120 + 265 * (i + 1), 100, 100, vbom);
    front.setColor(0.859f, 0.471f, 0.463f);
    front.setRotation(45);
    myScene.attachChild(front);
    
   }
  }

Now notice that you have rotated the rectangles. Also, the ones you attach first will be under those you attach afterwards (then attatch shadows first, like in the example)

At the end of this tutorial you should get something like this:


If you think you missed something, here is the full code:

public class MainActivity extends BaseGameActivity {
 
 private Camera camera;
 private static int CAMERA_WIDTH = 768;
 private static int CAMERA_HEIGHT = 1280;
 
 private Scene myScene;
 
 private VertexBufferObjectManager vbom;

 @Override
 public EngineOptions onCreateEngineOptions() {
  camera = new Camera(0, 0, CAMERA_WIDTH, CAMERA_HEIGHT);
     EngineOptions engineOptions = new EngineOptions(true, ScreenOrientation.PORTRAIT_FIXED, new RatioResolutionPolicy(CAMERA_WIDTH, CAMERA_HEIGHT), camera);
     engineOptions.setWakeLockOptions(WakeLockOptions.SCREEN_ON);
     return engineOptions;
 }

 @Override
 public void onCreateResources(
   OnCreateResourcesCallback pOnCreateResourcesCallback)
   throws IOException {
  
  vbom = getVertexBufferObjectManager();
  
  pOnCreateResourcesCallback.onCreateResourcesFinished();  
 }

 @Override
 public void onCreateScene(OnCreateSceneCallback pOnCreateSceneCallback) throws IOException {
  
  myScene = new Scene();
  myScene.setBackground(new Background(0.384f, 0.412f, 0.325f));
  pOnCreateSceneCallback.onCreateSceneFinished(myScene);
  
 }

 @Override
 public void onPopulateScene(Scene pScene, OnPopulateSceneCallback pOnPopulateSceneCallback) throws IOException {
  
  Rectangle rectangle1 = new Rectangle(384, 1080, 718, 50, vbom);
  rectangle1.setColor(0.894f, 0.980f, 0.694f);
  myScene.attachChild(rectangle1);
  
  Rectangle rectangle2 = new Rectangle(384, 1045, 718, 20, vbom);
  rectangle2.setColor(0.776f, 0.894f, 0.506f);
  myScene.attachChild(rectangle2);
  
  Rectangle rectangle3 = new Rectangle(384, 200, 718, 50, vbom);
  rectangle3.setColor(0.894f, 0.980f, 0.694f);
  myScene.attachChild(rectangle3);
  
  Rectangle rectangle4 = new Rectangle(384, 165, 718, 20, vbom);
  rectangle4.setColor(0.776f, 0.894f, 0.506f);
  myScene.attachChild(rectangle4);
  
  for(int i = 0; i < 3; i++) {
   for(int j = 0; j < 3; j++) {
    
    Rectangle shadow = new Rectangle(192 * (j + 1), 100 + 265 * (i + 1), 100, 100, vbom);
    shadow.setColor(0.329f, 0.380f, 0.435f);
    shadow.setRotation(45);
    myScene.attachChild(shadow);
    
    Rectangle front = new Rectangle(192 * (j + 1), 120 + 265 * (i + 1), 100, 100, vbom);
    front.setColor(0.859f, 0.471f, 0.463f);
    front.setRotation(45);
    myScene.attachChild(front);
    
   }
  }
  
 }
 
}

AndEngine has also the function Line, which is simple to use, but you should be careful with this one as it doesn't work in all devices. Rectancles are easy and safe to use!

Enjoy it and happy coding!

Saturday, January 31, 2015

AndEngine Tutorial 0 - Basic Game Activity

With this AndEngine tutorial you'll learn how to set up a Basic Game Activity

AndEngine Tutorial 0 - Basic Game Activity


Hello game developers! We are starting today a new set of publications here in the Visivae Mobile blog to share the basics about game coding for Android with AndEngine. If you need help to install AndEngine check this post.

For this first tutorial (number zero, because it is the basic of the basics) we are going to show you how to set up a game activity.

Opening a new Project


First things first, click on File, New, Project...


Choose "Android Application Project" and click "Next". Give a name to your Application, Project and Package Name (you can use the names in the image here below). Usually, as the minimum required SDK, I use 3.0, because earlier Android devices might be too slow for running a fancy game! Click "Next".


Unmark the box "Create custom launcher icon". Let's not worry about that now, we can create icons later! Keep clicking "Next" until finishing this process.


Great! You should have now two files opened in Eclipse, the "MainActivity.java" and the "activity_main.xml". Close the second one and let's concentrate on the java file only for now.

Now we need to add the AndEngine library to our project. Right-click on your project name and go to Properties. In the new window choose "Android" from the left menu, scroll down the right part and choose "Add...". Now add the AndEngine library and press OK to close the window.


Nice! Now we can start to play with the real stuff! Erase everything inside your public class MainActivity and extend it to BaseGameActivity. Now MainActivity might be showing you an error, then drag the pointer over it and choose "Add Unimplemented Methods" to fix it.


Now you should have the following code in your MainActivity class:
public class MainActivity extends BaseGameActivity {

 @Override
 public EngineOptions onCreateEngineOptions() {
  // TODO Auto-generated method stub
  return null;
 }

 @Override
 public void onCreateResources(
   OnCreateResourcesCallback pOnCreateResourcesCallback)
   throws IOException {
  // TODO Auto-generated method stub
  
 }

 @Override
 public void onCreateScene(OnCreateSceneCallback pOnCreateSceneCallback)
   throws IOException {
  // TODO Auto-generated method stub
  
 }

 @Override
 public void onPopulateScene(Scene pScene,
   OnPopulateSceneCallback pOnPopulateSceneCallback)
   throws IOException {
  // TODO Auto-generated method stub
  
 }
 
}


Now set up your camera parameters just before overriding the EngineOptions:
 private Camera camera;
 private static int CAMERA_WIDTH = 768;
 private static int CAMERA_HEIGHT = 1280;


Good, now let's set our Engine Options. Let's declare the camera, its position and size, define if you want your camera to be fullscreen, portrait or landscape, and select the ratio resolution. Finally, I'm using the setWakeLockFunction to prevent the device from sleeping while the player is playing.

Your EngineOptions class should look like this:
 @Override
 public EngineOptions onCreateEngineOptions() {
  camera = new Camera(0, 0, CAMERA_WIDTH, CAMERA_HEIGHT);
     EngineOptions engineOptions = new EngineOptions(true, ScreenOrientation.PORTRAIT_FIXED, new RatioResolutionPolicy(CAMERA_WIDTH, CAMERA_HEIGHT), camera);
     engineOptions.setWakeLockOptions(WakeLockOptions.SCREEN_ON);
     return engineOptions;
 }


So far, so good! We don't need to create any resources now, let's just define the callback for this method, making it look like this:
 @Override
 public void onCreateResources(
   OnCreateResourcesCallback pOnCreateResourcesCallback)
   throws IOException {
  
  pOnCreateResourcesCallback.onCreateResourcesFinished();  
 }


What about adding some color just to see how it will look in your device? :) Let's set up a scene and add a background color. First, declare your scene in the same place you've declared your camera parameters, like this:
 private Scene myScene;


Now set up your onCreateScene class to look like this:
 @Override
 public void onCreateScene(OnCreateSceneCallback pOnCreateSceneCallback) throws IOException {
  
  myScene = new Scene();
  myScene.setBackground(new Background(1.0f, 0.0f, 0.0f));
  pOnCreateSceneCallback.onCreateSceneFinished(myScene);
  
 }


Notice that for the Background function there are 3 parameters. They are exactly the RGB colors. The range of the colors goes from 0 to 255 and you should use the range from 0.0f to 1.0f proportionally to define your color. To set your red in 25, for example, use the parameter 0.1f.

An important tip: you need to change the base theme of your app, otherwise you might see white borders in the screen, which don't look nice at all! To do this, in your Project Explorer, to the left side, look for the folder "res". You will see more than one subfolder called "values" or values-vXX", where XX is a number. Open all the styles.xml inside these folders and change the AppBaseTheme "parent" parameter to "android.Theme.Black", so they will look like this:
    <style name="AppBaseTheme" parent="android:Theme.Black">
        
    </style>


Amazing! Leave the onPopulateScene as it is, we don't need it now. If you run your new application now (either in the emulator or in your own device) you should be able to see something like this:

AndEngine Tutorial 0 - Base Game Activity


Great! Now you know how to set up the basic game activity. We are going to use this structure in our following basic tutorials!

Here is the full code if you think you missed something on the way:
package com.example.tutorial;

import java.io.IOException;

import org.andengine.engine.camera.Camera;
import org.andengine.engine.options.EngineOptions;
import org.andengine.engine.options.ScreenOrientation;
import org.andengine.engine.options.WakeLockOptions;
import org.andengine.engine.options.resolutionpolicy.RatioResolutionPolicy;
import org.andengine.entity.scene.Scene;
import org.andengine.entity.scene.background.Background;
import org.andengine.ui.activity.BaseGameActivity;

public class MainActivity extends BaseGameActivity {
 
 private Camera camera;
 private static int CAMERA_WIDTH = 768;
 private static int CAMERA_HEIGHT = 1280;
 
 private Scene myScene;

 @Override
 public EngineOptions onCreateEngineOptions() {
  camera = new Camera(0, 0, CAMERA_WIDTH, CAMERA_HEIGHT);
     EngineOptions engineOptions = new EngineOptions(true, ScreenOrientation.PORTRAIT_FIXED, new RatioResolutionPolicy(CAMERA_WIDTH, CAMERA_HEIGHT), camera);
     engineOptions.setWakeLockOptions(WakeLockOptions.SCREEN_ON);
     return engineOptions;
 }

 @Override
 public void onCreateResources(
   OnCreateResourcesCallback pOnCreateResourcesCallback)
   throws IOException {
  
  pOnCreateResourcesCallback.onCreateResourcesFinished();  
 }

 @Override
 public void onCreateScene(OnCreateSceneCallback pOnCreateSceneCallback) throws IOException {
  
  myScene = new Scene();
  myScene.setBackground(new Background(1.0f, 0.0f, 0.0f));
  pOnCreateSceneCallback.onCreateSceneFinished(myScene);
  
 }

 @Override
 public void onPopulateScene(Scene pScene,
   OnPopulateSceneCallback pOnPopulateSceneCallback)
   throws IOException {
  // TODO Auto-generated method stub
  
 }
 
}


Happy coding and see you soon!

Monday, February 3, 2014

An introduction do AndEngine and how to set it up

AndEngine is your open source solution for developing Android games


If you are beginning to develop games for Android probably you’ve already heard about AndEngine. If not, let me introduce you.

AndEngine is a free Android 2D OpenGL Game Engine developed by Nicholas Gramlich. What does it means? It means that this brilliant guy created an ultra-flexible source code to spread good games development throughout the world! If you think I’m exaggerating check out this video showcase from AndEngine blog!

Well, enough of talking and let’s do some work. If you are a developer and would like to try AndEngine this is your place. I’ll post here some articles and tutorials that will help you unveil this wonder.

Let’s just check some pre-requisites first:
• Are you familiar with java?
• Have you installed Android SDK?
• Have you installed Eclipse?
• Have you been trying to develop Android apps or games?

If your answer is YES to all this questions you are ready to go on! If you answered NO to one or more questions I advise you to explore the Training room at Android Developers site.

So you are ready to go on and are getting excited about AndEngine! Good! I’ll list here the basic steps you need to accomplish in order to install AndEngine library in your Eclipse to begin developing your own games!

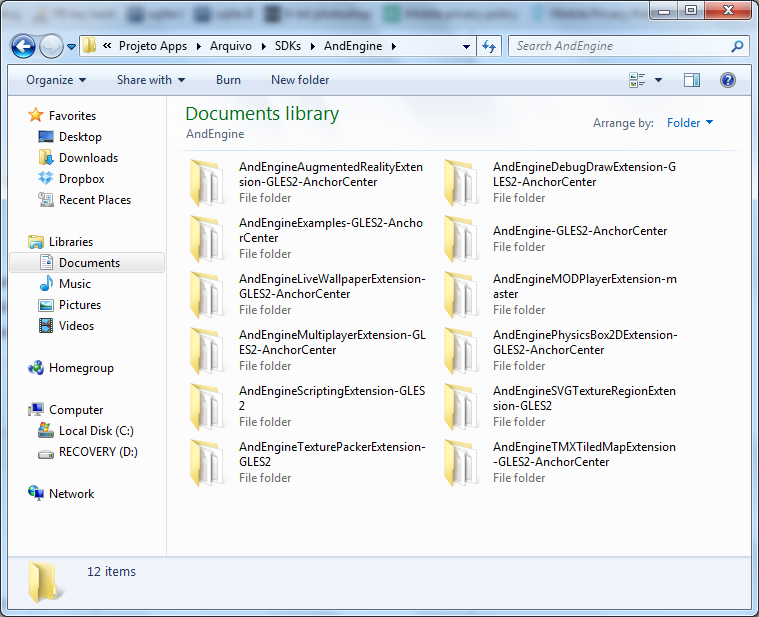
• Go to Nicholas Gramlich GitHub
• Download AndEngine source and save to a folder in your computer (make sure you are download the GLES2-AnchorCenter branch!) 

AndEngine Android game development


• Download all Extensions and save them to the same folder above (make sure you are download the GLES2-AnchorCenter branch when it is available – some extensions don’t have this branch!) 

AndEngine Android game development


AndEngine Android game development

• Import to eclipse as Existing Projects 

AndEngine Android game development

• Right click on each project showing an error, go to properties, Java Compiler and check if Compiler compliance level is 1.6 

AndEngine Android game development

• Right click on each project, go to Properties, Android and check Library. There Android will point to its own libraries and will show an error. What you have to do is to Remove this entries and Add them again (be sure to write down the entries before you remove so you won’t forget any of them!) 

AndEngine Android game development

• If there are still errors try Fix project properties/Clean all projects and reinitialize Eclipse
• Last but not least, I encourage you downloading AndEngine Examples App from Google Playstore to see AndEngine possibilities in your own device!

AndEngine Android game development


Well, that is it for now! I hope this helps you getting started!

See you in the next tutorial!